[Docker] 실습 - ECR, 이미지, 로드밸런서
2024.07.18 도커 실습 정리
#1 AWS ECR에 Docker 이미지를 저장하고 관리
* AWS ECR란?
Docker 이미지 레포지토리.
이미지를 저장하고 필요할 때 EC2 인스턴스나 다른 AWS 서비스에서 사용할 수 있게 합니다.
로컬 Docker 이미지를 AWS ECR에 업로드하고, 필요 시 이미지를 ECR에서 풀링하여 사용하며,
더 이상 필요하지 않을 때 이미지를 삭제. 이를 통해 AWS 환경에서 컨테이너 이미지를 효과적으로 관리할 수 있습니다.
> ECR 생성 및 이미지
EC2 Amazon Linux: docker 설치
1. awscli 설치.
pip install awscli
aws --version
- aws configure
-> aws iam 가서 확인
Access key:
Secret access key:
리전
json
2. aws account_id : 12자리 숫자
AWS 콘솔에서 계정을 클릭하여 확인
9750-xxxx-8247
3. 기본 레지스트리 인증
- Docker를 AWS ECR에 로그인시키기 위한 명령어
aws ecr get-login-password --region ap-northeast-2 | docker login --username AWS --password-stdin 9750xxxx8247.dkr.ecr.ap-northeast-2.amazonaws.com
sudo systemctl restart docker
오류가 있어서 저는 재시작 해주었습니다.
4. 레포지토리 생성
ECR에 새로운 Docker 레포지토리를 생성.
aws ecr create-repository --repository-name ubuntu --region ap-northeast-2
5. 기본 이미지 다운로드
(없는 경우)
docker pull ubuntu:22.04
6. docker image에 태그
다운로드한 이미지를 ECR에 푸시하기 위해 태그 추가
// docker images 목록 확인
docker tag ubuntu:22.04 9750xxxx8247.dkr.ecr.ap-northeast-2.amazonaws.com/ubuntu:22.04
7. image 업로드
태그를 추가한 이미지를 ECR에 푸시
docker push 9750xxxx8247.dkr.ecr.ap-northeast-2.amazonaws.com/ubuntu:22.04
8. 레지스트리 확인
aws ecr describe-images --repository-name ubuntu --region ap-northeast-2
9. image pull
ECR에서 이미지를 다운로드
docker pull 9750xxxx8247.dkr.ecr.ap-northeast-2.amazonaws.com/ubuntu:22.04
10. docker run
다운로드한 이미지를 실행
docker run -it 9750xxxx8247.dkr.ecr.ap-northeast-2.amazonaws.com/ubuntu:22.04
11. 이미지 삭제
aws ecr batch-delete-image --repository-name ubuntu --image-ids imageTag=22.04 --region ap-northeast-2
12. 레포지토리 제거
aws ecr delete-repository --repository-name ubuntu --force --region ap-northeast-2
------------------------------------------------------------------------------------------------
#2 Docker 컨테이너 실행 시 하드웨어 리소스를 제한하고 관리
Docker 컨테이너의 리소스 사용을 제어하여 시스템 성능과 안정성을 보장하는 데 유용
docker -run --help
-m memory 메모리 사용 제한
-oom out of memory
- 메모리 사용 제한
docker run -d -m 512m --name web nginx:latest
- 컨테이너 상태 확인
docker inspect web
-컨테이너 중지 및 제거
docker stop web
docker rm web
-가상메모리 사용 제한
docker run -d -m 256m --memory-swap 512m --name web nginx:latest
가상메모리-swap메모리. 물리 메모리의 1.5배~2배 할당.
- 최소 메모리 128m
docker run -d -m 256m --memory-swap 512m --memory-reservation 128m --name web nginx:latest
- 비활성화
docker run -d -m 256m --memory-swap 512m --memory-reservation 128m --oom-kill-disable --name web nginx:latest
오버되는 것들 kill할것이냐. -> disable
메모리 한도에 도달해도 Out Of Memory (OOM) 킬러가 컨테이너를 종료하지 않도록 설정.
- cpu 개수 제한
docker run -d --cpus=1 -m 128m --name web1 nginx:latest
cpu개수 1개 / 0.5개도 가능.
- 특정 cpu 코어 사용
docker run -d --cpuset-cpus=0-3 -m 128m --name web1 nginx:latest
4개를 쓰겠다.
0,1 도 가능
- 블록 제한
docker run -d --rm --blkio-weight 100 --device-write-iops /dev/vda:10 --name web2 nginx
weight 기본 값 500.
100-1000까지 설정 가능
-> 블록 가중치, 속도 제한 등등 컨테이너의 자원 사용을 효율적으로 관리, 제어
------------------------------------------------
#3 하드웨어 리소스 제한
docker-compose로 하드웨어 리소스 제한 구성.
도커 컴포즈 세팅
https://docs.docker.com/compose/install/
mkdir -p ~/cimages/nginx/html
------------------------------------------------
nginx 웹 서버 설정 파일
<vi nginx.conf>
events {}
http {
upstream nginx_backend {
server nginx:80;
}
server{
listen 80;
server_name localhost;
location /{
proxy_pass http://nginx_backend;
proxy_set_header Host $host;
proxy_set_header X-Real-IP $remote_addr;
proxy_set_header X-Forwarded-For $proxy_add_x_forwarded_for;
proxy_set_header X-Forwarded-Proto $scheme;
root .html;
index index.html;
}
}
}
------------------------------------------------
nginx를 설치하고 실행하기 위한 파일.
도커 이미지 생성 스크립트
<vi Dockerfile>
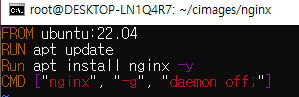
FROM ubuntu:22.04
RUN apt update
Run apt install nginx -y
CMD ["nginx", "-g", "daemon off;"]
------------------------------------------------
Docker Compose를 사용하여 Nginx 웹 서버와 로드 밸런서를 설정.
<vi docker-compose.yml>

services:
nginx:
image: nginx:latest
expose:
- "80"
volumes:
- ./html:/usr/share/nginx/html // 이 디렉토리에 마운트
load_balancer:
image: nginx:latest
ports:
- "80:80"
depends_on:
- nginx
volumes:
- ./nginx.conf:/etc/nginx/nginx.conf // 마운트
포트 설정:
단일 nginx 컨테이너가 포트 80을 사용하여 호스트와 연결.
expose 키워드를 사용하여 컨테이너 내부의 포트 80을 호스트에 노출.
볼륨 마운트:
단일 nginx 컨테이너에 ./html 디렉토리를 마운트하여 하나의 HTML 파일을 제공
------------------------------------------------
vi html/index.html
<!DOCTYPE html>
<html>
<head>
<title> Welcome to nginx!</title>
</head>
<body>
<h1>Success!</h1>
</body>
</html>
------------------------------------------------
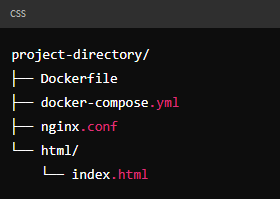
프로젝트의 디렉토리 구조 확인.
ls -R
Dockerfile docker-compose.yml nginx.conf
./html:
index.html
--------------------------------------------------
docker-compose up -d --scale nginx=2
autoscaling과 같은 기능
컨테이너 개수 조정
-> 각 컨테이너는 동일한 설정과 볼륨을 공유. 2개의 컨테이너로 실행.
load_balancer가 nginx 서비스의 여러 인스턴스로 트래픽 분산.

docker-compose ps
컨테이너 상태와 포트 매핑
docker-compose run nginx env
컨테이너 환경 변수 확인
------------------------------------------------
<vi docker-compose.yml>
-> 다른 값을 주어서 LB 확인해보기 위해서
다른 버전으로도 코드를 짜보았습니다.
services:
nginx1:
image: nginx:latest
volumes:
- /root/cimages/nginx/html/nginx1:/usr/share/nginx/html
networks:
- nginx-net
ports:
- "8080:80"
nginx2:
image: nginx:latest
volumes:
- /root/cimages/nginx/html/nginx2:/usr/share/nginx/html
networks:
- nginx-net
ports:
- "8081:80"
nginx3:
image: nginx:latest
volumes:
- /root/cimages/nginx/html/nginx3:/usr/share/nginx/html
networks:
- nginx-net
ports:
- "8082:80"
nginx4:
image: nginx:latest
volumes:
- /root/cimages/nginx/html/nginx4:/usr/share/nginx/html
networks:
- nginx-net
ports:
- "8083:80"
load_balancer:
image: nginx:latest
depends_on:
- nginx1
- nginx2
- nginx3
- nginx4
ports:
- "80:80"
volumes:
- /root/cimages/nginx/nginx.conf:/etc/nginx/nginx.conf
networks:
- nginx-net
networks:
nginx-net:
---------------------------------------------------------------------------
포트 설정:
각 nginx 컨테이너(nginx1, nginx2, nginx3, nginx4)가 각기 다른 포트(8080, 8081, 8082, 8083)를 사용하여 호스트와 연결.
볼륨 마운트:
각 nginx 컨테이너(nginx1, nginx2, nginx3, nginx4)에 별도의 디렉토리를 마운트하여 각각 다른 HTML 파일을 제공.
이 코드는 여러 개의 nginx 컨테이너를 각각 다른 포트로 노출하여 서로 다른 내용을 제공하는 방식이며, 처음에 했던 파일은 단일 nginx 컨테이너를 사용하여 포트 80을 통해 하나의 HTML 내용을 제공하는 방식이라는 차이가 있다.
-----------------------------------------------------------------------------
기본 세팅 화면

오늘은 여기까지